
Marketing Cloud Account Engagement 101: Email Preference Page
We created a newsletter to help Marketing Cloud Account Engagement (formerly Pardot) users expand their knowledge on (and love for) Marketing Cloud Account Engagement. Sign up for your dose of marketing automation goodness here.
How familiar is this scenario: You’ve received an email newsletter from a retailer but you cannot remember when you signed up for these emails. You scroll to the bottom to find the unsubscribe hyperlink, which you click. You’re taken to a web page (what’s called an email preference page) with several newsletter options and an “Unsubscribe from all” button. You notice you’re subscribed to several different newsletters with cryptic names like “Sales Newsletter” and “Monthly Update List”.
Now, you’re annoyed. How did you get on all these lists?
In a passing moment of frustration you click “Unsubscribe from all” and wait for a pop-up message on the page to confirm you’re unsubscribed. Then you close the tab and go back to your inbox.
Only to find an unsubscribe confirmation email you have to delete.
Or, only to find another email from the retailer a week later.
It’s safe to assume, this scenario has happened to you. But, this might be the experience your subscribers are having too. And it might even be the experience your subscribers are having with your own email subscriptions.
Let’s fix that
If you’re using Marketing Cloud Account Engagement (MCAE), you can easily create and edit an email preference page for all of your subscribers to update their own preferences. And we do mean easily since MCAE automatically creates one for your account.
This blog post is designed to help you understand what exactly an email preference page is, how it works, and how you can set one up while following best practices.
And, hopefully, curb some of your subscriber’s annoyance and keep them on your lists.
What is a Marketing Cloud Account Engagement email preference page?
This is the page your subscribers will navigate to when they click “update email preferences” in an MCAE email. This feature lets your subscribers choose their level of interaction with you.
The email preference page is a default or custom landing page for your subscriber’s, or prospect’s, subscription preferences. (In this article we will use subscribers and prospects interchangeably.)
How does an MCAE email preference page work?
These pages are dynamic, meaning they change per prospect. They show all your prospects the "Public" Lists they are on and allow them to opt out of or into these Lists.
When you build a List, you have the option to check several things including "Public” and "Dynamic".
Making a List "Public" allows you to display that List to a prospect on their email preference page. You can (and should always) add a public-facing "Label" and "Description" to help your prospects understand why they are on that List.
Additionally, by making a List "Dynamic" you can set up criteria for who can be added to this List (and therefore see it on the email preference page). So if you want to control who is subscribed to a List, we recommend you make it Dynamic. If you want anyone to be able to opt into a List and see it on your email preference center, do not make it Dynamic.
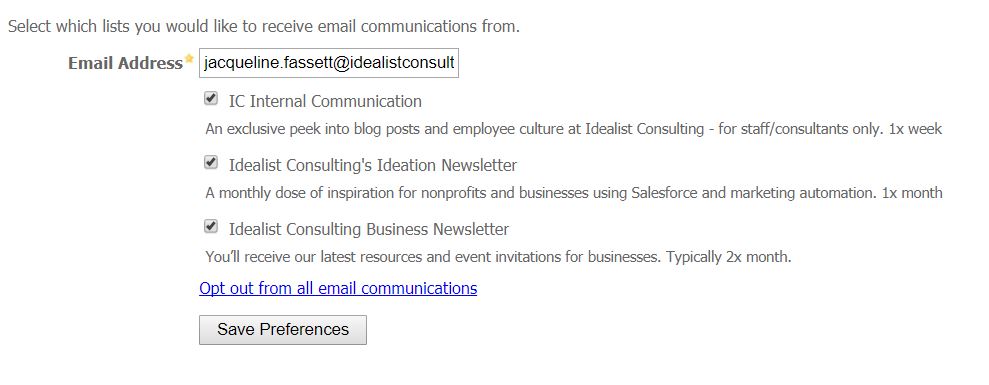
What does an MCAE email preference page look like?
Below I show what an out-of-the-box email preference page looks like. You can update this page with your branding by using some custom coding.
Now, let's talk about how a page can be viewed.
If the page is using all Dynamic Lists (so only prospects on the Lists can see the Lists) and is viewed in an incognito window, or by someone who is not a prospect, the page will display a blank email field.
As you can see below, this incognito view is pretty meaningless, so if you want to encourage new subscriptions you should not send them to this page. We recommend creating a landing page where visitors can submit a form and be added to these lists. We talk more about this and link to our own landing page at the end of Step 3.
Here’s what my email preference page looks like when I open in a regular window:
Here’s what my email preference page looks like when I open in an incognito window:

How does an MCAE email preference page differ from other email solution’s email preference pages?
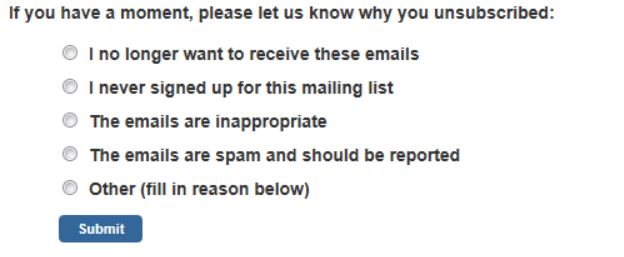
Unlike the survey feature of MailChimp and several email solution providers, there is no survey from MCAE that appears after someone unsubscribes asking them why they no longer want to be on the list or hear from you. This makes it hard to know how you can change your email habits to keep subscribers.
We recommend you spend some time looking at unsubscribers individually to see if they are people you would want to keep on your list (ie a potential member/donor/client). If so, talk with your colleagues about what changes you could make to the email or the frequency that might have kept them. If not, don’t worry about it. The world has enough unneeded emails and by culling your list, you will likely get better engagement from those who are left.
How to view and edit your default email preference page
Step 1
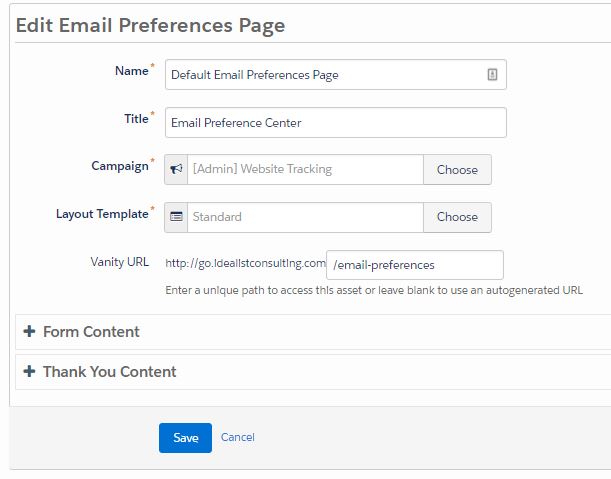
Navigate to Marketing > Emails > Preference Pages. Click into the Default Email Preferences Page.
By default, your primary Email Preference Page is named 'Default Email Preferences Page”. It’s also titled 'Email Preference Center,' and is placed on a 'Pardot-Generated Default Email Preferences' layout template. See image below.

Step 2
Click Edit, in the top right corner. This allows you to change all of the names and settings. In the beginning, we suggest you do not edit the campaign or layout template.
If you would like a new or custom email preference page, follow these instructions from MCAE. However, we have found it works fine to just edit the default page to start.
We do suggest you add in a vanity URL. You should also check the form content and thank you page content to customize any messaging for your subscribers.
Step 3
Next, you need to tell MCAE (powered by Pardot) who can and cannot see this page. You’ll do this by adding Public Lists to your email preference page.
Navigate to Marketing > Segmentation > Lists.
Next, edit lists to make them Public or create a new Public List.
As your subscribers will only see lists you make Public, you must either create a new list or edit lists you have already created to be Public. Here’s how to do either option.
- To make a new Public list
- Click Add List. In the window to name and set basic settings.
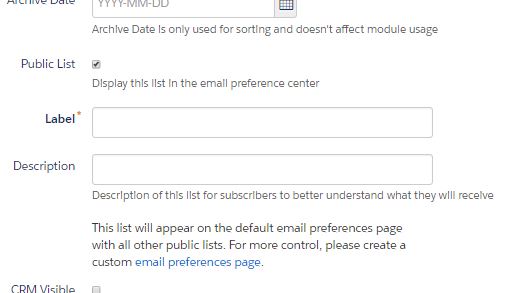
- Scroll down and check the Public List box. A label and Description text field will appear. These fields will be what is visible to your subscribers.
- Fill the Label and Description sections in with thought. Further down in this article are best practices for naming and describing your Public Lists.
- To make a current list Public
- Navigate to the list and click Edit. A window will pop up with the naming and setting fields.
- Scroll down and check the Public List box. A label and Description text field will appear. These fields will be what is visible to your subscribers.
- Fill the Label and Description sections in with thought. Further down in this article are best practices for naming and describing your Public Lists.
A final note on Public Lists. A great way to bring in all the right prospects to your Public Lists is to make them Dynamic Lists or create automation rules to add certain lists automatically to one big Public List. This way you are not trying to recreate dynamic rules for many different types of prospects, but rather allowing for all types of prospects to be added to your Public Lists in an easy-to-edit way.
For example, our monthly newsletter is sent to one big Public List that is comprised of a few smaller lists, including prospects who have opted-in to our newsletter through a button on our blog that links to our “Subscribe to our Ideation Newsletter” landing page.
In general, you should consider large, pre-scheduled types of communication as good candidates for including on the Preference center list, because you can be transparent about why they’re on the list and how often they can expect to hear from you. Here are some examples:
- Company newsletter
- Feature updates
- Special offers on relevant products
- Event or webinar announcements
We’ll get into suggestions for naming and descriptions below. Note that you won’t include emails sent through Engagement Studio here.
Step 4
You’re all set! But it’s best practice to review your email preference page before you move on.
Navigate back to the default email preference page by going here Marketing > Emails > Preference Pages.
Next, navigate into the Default Email Preference Page and click Preview page with dynamic lists.
Check that your preference page looks easy to opt in and out of lists. Try showing it to a coworker not in a marketing role. Then, make sure you’re following the best practices listed below. Voila- you’re done!
Want to try this out first without editing your own MCAE instance? Check out this older interactive eLearning module from Pardot to get hands-on experience at creating and editing an email preference page.
Top best practices for your email preference pages
Ok, so now you have the hang of how to set up your preference center. In order to really make it sing you should consider the naming and a few other key details.
1. Name and describe your Public Lists appropriately
This is one of the easiest ways to keep your subscribers updated and on your lists (besides using email best practices like segmenting your lists and sending relevant content).
Make sure the labels you use are easy to understand and okay for public viewing. With labels you’ll want to include keywords to the types emails they receive for being on this list. For example, “XYZ Company’s New Feature Updates” or “Acme Corp.’s Upcoming Webinars”.
Additionally, you’ll want to follow those same guidelines with descriptions. Make sure to include the cadence of these newsletters. For example, our Ideation newsletter has the description of “A monthly dose of inspiration for nonprofits and businesses using Salesforce and marketing automation. 1x month”.
And, that cadence is something we try to stick to when creating each Ideation. This helps keep us honest and our subscribers happy.
If you don’t have the final say on external facing marketing, send a list of these names and descriptions to the person who does have final approval before you create them or make any lists public in MCAE.
2. Consider ordering your Public Lists
Lists are sorted alphabetically on the email preference page. In an effort to put some lists at the top when your subscribers view their email preference page, you can use numbers or letters at the beginning of the label to order them. For example, “1- XYZ Company’s Weekly Newsletter” or “A- ABC Nonprofit’s Quarterly Report”.
This will be helpful if you have a huge number of Public Lists and you’d like to make sure they see the company newsletter first. Note, you cannot customize this order for each prospect but you can help make sure your top lists are seen first.
3. Regularly review your Public Lists and preference center page
When writing a recent newsletter, I noticed I had switched to sending to a non-public list at some point recently. By reviewing my public lists regularly (for Idealist Consulting this is quarterly), I was able to see which list I should have been sending to, review any dynamic rules or automation rules adding prospects to that list, and make any necessary changes.
For this reason and many others, you’ll want to review your public lists (including labels and descriptions) regularly plus your email preference center page, to make sure everything is in working order.
4. Edit your unsubscribe message on your emails
Here is my favorite tip for making the most of subscriber preference features. Want to cut down on clutter, keep your subscribers happy, and your opt-out rate low? We suggest updating the language at the bottom of your emails to include only the “Update Email Preferences” hyperlink option (removing the “Unsubscribe” option). Why?
Well, first Marketing Cloud Account Engagement only requires you use one. Second, by sending subscribers to your email preference center page, instead of letting them automatically opt-out through an unsubscribe link, you allow them to see what all they are subscribed to and/or unsubscribe from all your emails.
Giving them the choice to determine their email preferences and see their options can vastly help your opt-out rates and engagement with your subscribers. By following this best practice ourselves we have seen our opt-out rates drop significantly (down from 1.6% to .4%!). We’ve also seen prospects change their preferences without unsubscribing from all our communications.
By following these steps and best practices, you can create an email preference page to keep your subscribers happy and up-to-date with all your news and offerings. Once you’ve got these down, maybe you’ll even venture to create a custom email preference page with a hilarious video like this one, to decrease your opt-out to their all-time low.
We share lots of tips like this in our monthly newsletter, sign up below!